Application Guide : How to Apply Your Labels
Name Label Application Guide
How do you sew on school labels? Look no further, we’ve put together our ultimate name labelling guide to help you through the process. Whether you’re a veteran of back to school or if your child has just begun nursery, we have the answers to your questions.
Not only have we created this guide for application of children’s school labels but for the application of our best-selling care home/nursing home range.
Check out our full label application guide for our sew on labels, iron-on labels as well as our snap-on and sew-on labels too. We’ve also included some tips and tricks we’ve learned over the years to make the whole process as easy as possible.
We promise, labelling your children’s items is well worth it. Not only will it help to prevent your child from losing their uniform, P.E Kit or stationery but they help to prevent waste, save you money and keeps you in the teacher’s good books!
How to apply stick on labels securely?
Stick-on name labels are our most popular product in our range and they can be applied very quickly in three easy to follow steps:
Step 1: Firstly, ensure the smooth surface or clothing laundry label is clean and dry. We suggest washing brand new uniform once before applying name labels for best results. Peel the label from the backing it arrived on to expose the sticky underside.
Step 2: Place the stick- on name label firmly onto your clean surface or onto the care label (on the inside of school uniform) and smooth over avoiding bubbling. Take care to align the label so no moisture could get underneath.
Step 3: Allow at least 24hours before washing the uniform again to ensure your sticky name labels last as long as possible.
Our handy video might help to illustrate these steps:
Stick on Label buying guide
No parent or carer wants to order stick on name labels, apply them, then find they have rubbed off school uniform after the first wash! So here are our top tips for buying school stick on labels:
* It’s best to purchase your stick- on labels from a company who have been around for a while and has mastered their designs over the years.
* Check the company reviews. Were other customers pleased with their labels and if they had any problems were these resolved quickly?
* Purchasing from independent UK businesses. This keeps your carbon footprint lower than if you were to buy abroad. Plus, it supports the local economy and lowers the chance of your item being caught in customs or damaged along a long shipment journey.
* Check what the returns policy is. Many companies do not offer a returns policy on personalised items unless there is a fault. However, companies like Labels4Kids offers a full money back guarantee because we’re so confident in our products. So, you can buy with confidence!
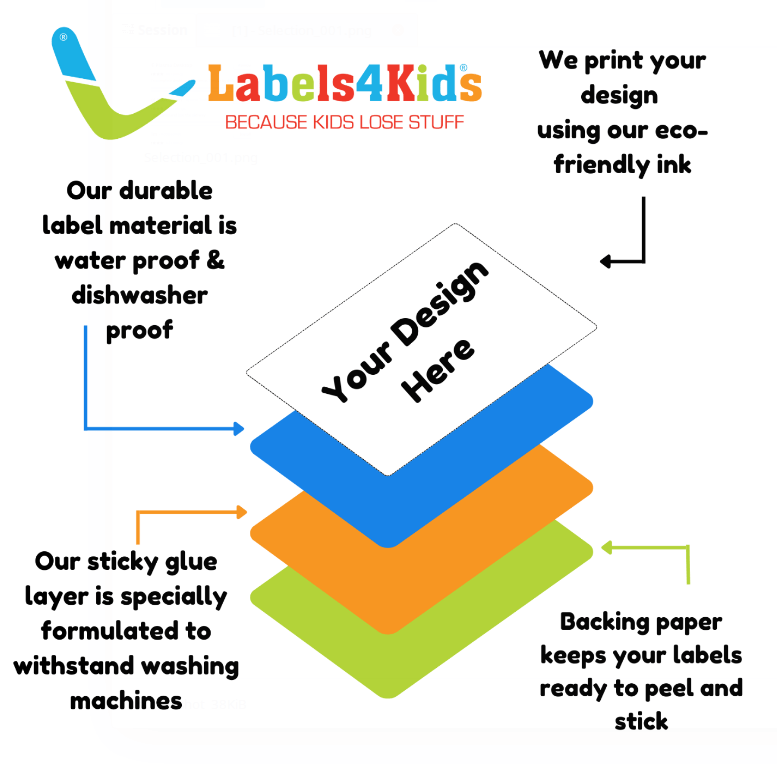
What are stick on name labels made from?
That’s top secret! We have our own specific way of making our labels super sticky and durable that we like to keep to ourselves. But here’s what we can tell you:
How long will my stick-on uniform labels last?
We always want to be completely transparent with our customers and that’s why we always advise that our stick-on labels have been tested up to 30 washes at 40degrees. However, there are many instances where parents have told us that their children’s uniform labels have lasted much, much longer. Our classic stick-on labels are also suitable for smooth surfaces such as water bottles and in these cases, we’ve had feedback from parents that our labels have lasted on their children’s lunch bottle for literally years!
Our top tips for making your labels last as long as possible:
- Wash laundry at as low temperatures as possible. Not only will this help to save the planet but it will also look after the garments as well as your labels. A win- win!
- Make sure kids don’t pick or play with their name labels. Children might be tempted to peel or pick at their labels. However, this can create space for water to get underneath the sticky layer and mean the labels fall off much sooner.
- Stick your labels in the smoothest possible places, for example the laundry label of garments, the smooth underside of a lunch box or the flat section of a remote control. Avoid sticking your labels over bumpy or rough surfaces as they are less likely to last.
- Try not to use harsh chemicals in washing machines or dishwashers as this will degrade your labels sooner.
How’s best to apply iron-on labels?
Iron on labels are long lasting labels that adhere to clothing using the heat from an iron. So it’s important that you take the time to decide where you would like them placed because they can be very difficult to remove. There are a number of things to think about when deciding how to apply your iron on label:
- Will my label be visible? You want to place your labels where teachers or other parent’s/carers will notice them. Check to see if your school or after school clubs have a specific place, they encourage you place your labels. Then, more than likely anyone who has spotted a lost item of clothing will know where on the garment to look.
- What colour should my label be? Some schools are very specific about the colour of labels that they allow and what they discourage so it’s worth double checking that your iron on labels adhere to the uniform standards of your school. Many parents prefer a pink or blue colour on school polo tops or shirts so they are easily spotted. But some prefer the white option to match. It’s mostly personal preference.
- What should I include on my child’s iron on label? This question is one we get a lot. Usually, a name will suffice. However, that will only work if your item is lost during school time. If a garment is lost at an after-school club out of school or at the weekend a name will only help to identify the item, should you come looking for it. We normally suggest a name and either school or parents phone number so if someone finds a lost item they can get it back to the owner more easily.
How do I apply my iron on labels?
Typically, to iron on labels you need to follow a few key steps:
Step 1: Heat up your iron to a high temperature without the use of steam. If possible, make sure there is no water in your iron as you need a dry heat.
Step 2: Place your iron on label where you’d like it to attach, smooth out the fabric as best as you can.
Step 3: This is the most important step, iron over your labels firmly taking care to apply pressure evening and check that the edges all around are sealed to the fabric to prevent moisture getting in.
Step 4: Allow at least 24 hours before washing. Be careful of your fingers as the labels will need to cool down for a moment.
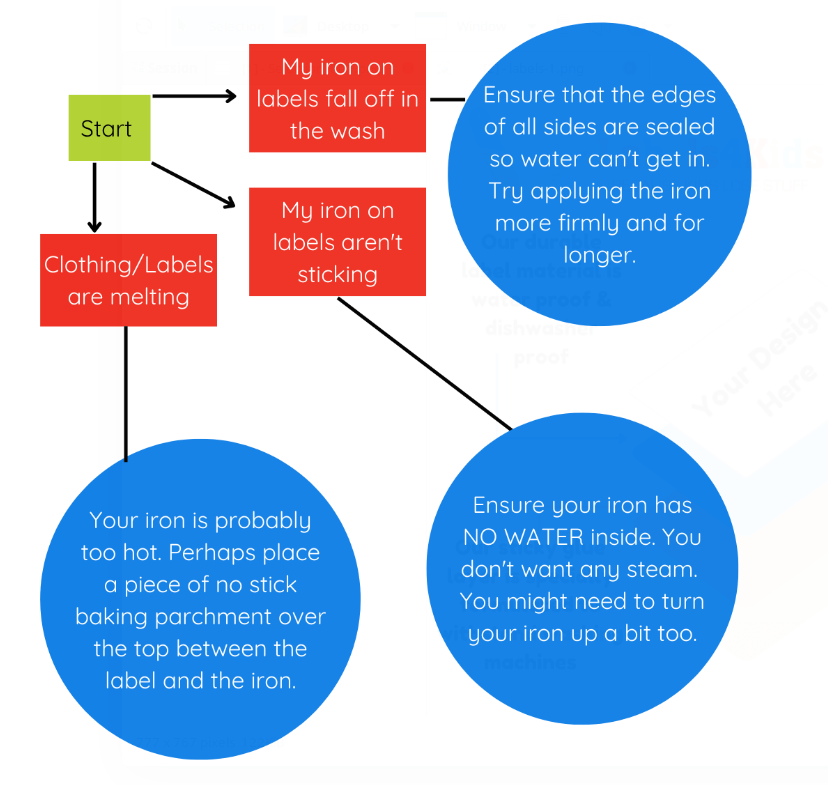
What do you do if your iron on label isn’t sticking?
There have been occasions where parents have contacted us to let us know they have had some difficulty but normally a few quick tweaks and they are easily able to adhere their labels. We’ve come up with this easy-to-follow flow chart to help you troubleshoot some common mistakes:
Where should I sew on school name labels?
There are a few areas that you can sew on name labels. We’ve put together a handy visual guide for some best placed to sew on your back to school uniform labels:
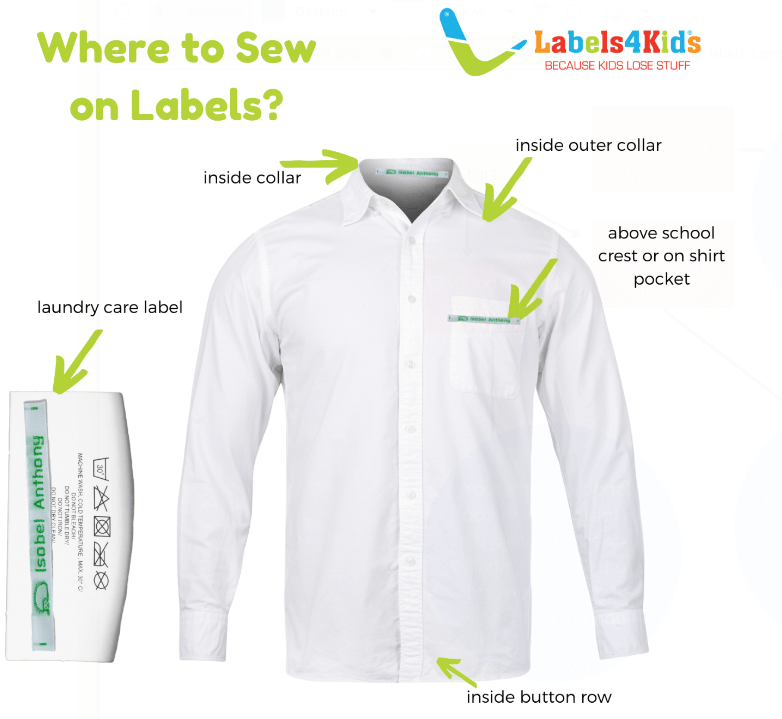
- Laundry care label: Depending on the size of the laundry care label you can sometimes easily sew woven name labels into the top or reverse side. Be careful not to cover any specific laundering instructions, especially if your child is boarding or if you’re using these within a care home setting.
- Inside button row: this option is less common. However, the hemline on the button side of garments is an excellent place to sew on labels due to the sturdy material.
- Inside collar: this tends to be the most popular option and potentially the most likely place where someone might check. However, this might not be the best place for neurodivergent children who are particularly sensitive to textures.
- Above school crest/ on shirt pocket: we see that this is the most common placement for games kit or for those schools who have a crest. It’s also sometimes a requirement for blazers. This placement of sew on labels does have its drawback because strangers will be able to use their name from a glance if there were to be out of school bounds.
- Inside outer collar: This is a useful place for thicker materials and for polo shirts where the thread won’t be visible while the garment is being worn.
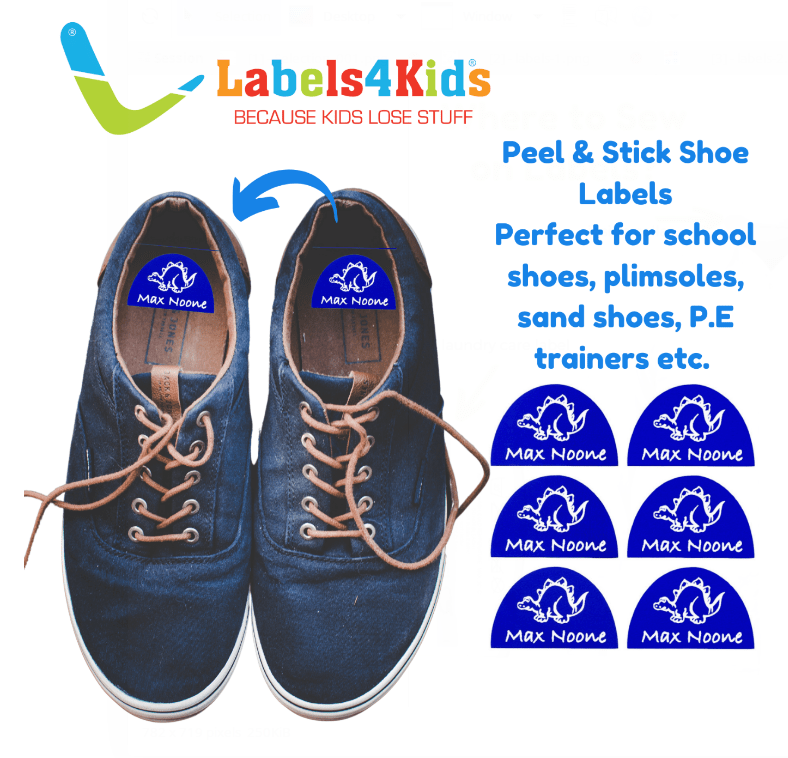
How do you label school shoes?
Labelling school shoes need not be a hassle. Once you’ve decided what pair your child will be wearing make sure that you don’t forget indoor plimsoles, football boots, dance shoes or P.E trainers too.
- Ideally, you’re looking to label shoes before any wear and before any moisture has managed to accumulate in the insole.
- Peel the shoe label or stick on label from the backing and place on the heel of the insole of the shoe or boot. If you’ve decided on a left and right option, make sure you’re placing the correct label into the correct left or right shoe!
- Place the clear shoe cover over the top to protect your label from scuffing and moisture to ensure the longest wear.
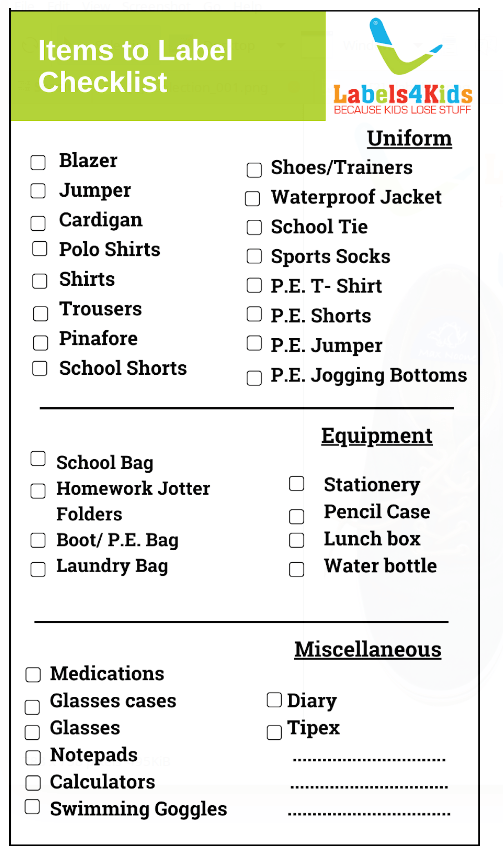
What back to school items should I label?
Before buying name labels or sew in name tapes you need to consider where you’re going to use them. Not all labels are suitable for a boil wash. Therefore, in situations such as for care home use or use in B&Bs you need to ensure you’re selecting the most appropriate options for you. Luckily, companies like Labels4Kids have friendly and knowledgeable staff on hand to answer any questions or queries that you might have. If in any doubt, it’s definitely worthwhile checking that the labels you intend to purchase are suitable for what you plan to use them for. Or, alternatively, you can stick to products which are multipurpose labels which can be used on a variety of surfaces and are dishwasher, machine washing, steriliser, microwave and tumble dryer friendly.
Once you’re sure you have selected the appropriate product for use and you’re happy that it’s fitting with any uniform or care home guidance it’s time to apply your name labels. A good set of questions to ask yourself when deciding what items to labels are:
“Would it take longer than a day to find, order and have a replacement delivered?”
“Is this item expensive or difficult to replace?”
“Would my child be upset if they lost or misplaced this item?”
“Is this item something that could be left at school, in a friend’s house, at an afterschool club?”
Asking yourself these questions can be handy, if the answer to any or all of them is yes then it’s a good rule of thumb to add a label where you can with some way to reunite the possession or garment with you. We normally suggest a parent’s telephone number or a school name.
We’ve created this handy list of items that are useful to label when thinking about the new school term:
What if I need to remove my children’s name labels?
In the unlikely event that you need to remove your child’s name labels there are a few options that you can try:
+ To remove sew on labels you can unstitch the thread that you attached them with. Alternatively, if you’re very careful not to cut the garment you can simply cut them out. If you’ve attached a label to the laundry tag make sure you don’t need the washing information!
+ If you’re looking to remove snappy tags this can only be done with the applicator, so make sure you don’t misplace or get rid of the applicator even after you’ve used up your snappy tags.
+ Stick on labels can be removed by soaking in the hottest water possible and then peeled off using a scraper or an old rigid piece of card. This might take a few attempts and you might need to use a sticker remover spray to get rid of any residue left behind.
+Iron on labels are almost impossible to remove because they essentially melt onto the surface of the garment. Should you wish to remove them to use for another child we suggest you iron over another label on top instead.
Care Home name labels guide
Care homes and residential communities for those with additional support needs often need residents’ garments and belongings to be labelled clearly to avoid mix ups. Often, laundry is done communally and then later separated for distribution back to the owner. Some care homes require specific types of labels or in some instances take care of this for you. But, it’s important to check before your loved one arrives so there is no chance of personal belonging getting mixed up or lost.
Things to consider when buying for a care home setting are the durability and longevity of labels. Ideally, you don’t want to have to replace labels every month or after a few washes. Moreover, you don’t want staff to have to struggle to read faded labels or labels which have come off in the wash for them to clean up. Labels which can withstand a boil was are also very important because for hygiene, many residential homes wash laundry at very high temperatures which some labels are not designed for.
We always suggest checking what your care home requires to be on your label too. For example, do they require a telephone number, a room number or simply a first and last name. Some care homes prefer initials etc.
Next, you need to consider the size of the labels. If you’re labelling item for the resident’s benefit, you’ll need to ensure that the font is large enough and legible for the owner to recognise their own belongings such as a remote, charger or a glasses case. However, if you’re labelling purely for the staff to recognise who items belong to you can enquire where they prefer labels to be placed for ease of use.
If you’re buying labels for a loved one, relative or family friend it’s worthwhile steering clear of any patterns, garish colours or designs. Simple and clearly legible labels are the most suitable in these circumstances unless you’re confident in their favourite colour or a preferred icon.
When applying labels to personal possessions it’s important to be mindful that these may well be treasured possessions and it’s best to place labels in the most unobtrusive places as possible. For example, the base underside of a trinket box or the inside cover of a book.
Labels4Kids top tips and recommendations
Do make sure you’re prepared. Don’t wait until the week before school returns from a break and give yourself unnecessary stress.
Do double check with your school/ care home/ nursery or after school club to see if they have any specific rules to follow
Do ensure that the labels you’re purchasing are appropriate for what you need them for.
Do double check spelling and grammar. Mostly labels are sent straight to production from point of sale and will therefore be printed exactly what you’ve typed in.
Do read reviews and take a look at the companies return policies.
Do buy a pack that allows you some spares because often you’ll realise you need them for a new jotter or shirt later on in the term.
Don’t just assume, check that a label will be microwave proof/ water proof etc.
Don’t buy labels and cut them. This breaks the seal and means they won’t last nearly as long.
Don’t be shy to ask questions or queries. The choice can sometimes we overwhelming so ask our friendly staff for some helps should you need it. They’re here to help.
Don’t get mixed up and send the order to the wrong address. This will cause delays in getting your labels out to you.
We hope this bumper guide has told you everything you might need to know about sew on labels, iron on labels, school uniform labels and everything in between. If there’s something we’ve missed or you have a specific question you might be able to find the answer in our extensive FAQ page.
Alternatively, please do get in touch via your preferred method. Labels4Kids contact details are available for you. We’re happy to help.
